Battery Charging Guide
Follow the steps in this guide to learn how to charge, balance, and store your battery.
Charging an External Battery
Battery Charging Details
Where to charge
Always charge in a safe area that is dry, indoors, between 50 °F–77 °F (10 °C–25 °C), and away from direct sunlight, dirt, or debris. Arrange the bike, battery, and charger to eliminate the potential for trip hazards, damage to the bike, battery, or charger.
When to charge
A new battery should arrive with between 50% and 75% of a charge. You can ride the bike right away, without charging, once the bike is assembled and verified as safe by a local, certified, and reputable bike mechanic. After the first ride, a new bike or a bike with a new battery should complete the battery charging process outlined in the Battery Balancing section.
We recommend charging the battery fully after each ride so your battery can power you for the full range the next time you ride Rad! The battery has no "memory" so you can charge your battery after each and every use, even if you just take a spin around the block.
A battery with a partial charge can be left without immediately charging back to full. It should be charged as soon as possible when the battery bar on the display is flashing to indicate the battery is low.
How long to charge
Charging the battery from completely empty to completely full typically takes between 3–7 hours. Charging time depends on various factors including distance travelled, riding characteristics, terrain, payload, and battery age. Take a look at the table below for more details.
| Distance | Recharge Time |
|---|---|
| 5 mi (8 km) | 1 hour |
| 10 mi (16 km) | 1.5 hours |
| 15 mi (24 km) | 2.5 hours |
| 20 mi (32 km) | 3.5 hours |
| 25 mi (40 km) | 4.5 hours |
| 30 mi (48 km) | 5.5 hours |
| 45 mi (72 km) | 7 hours |
Do not use a battery or charger not purchased directly from Rad Power Bikes. Aftermarket or third-party products have not been tested for safety and compatibility with our bikes and use of these products could cause issues, including property damage, voiding your warranty, or injury/death.
Battery Charging Steps
Follow the steps below to learn how to charge the battery. If your battery is new, ensure you follow the steps in the Battery Balancing Steps section to help keep your battery in great shape.
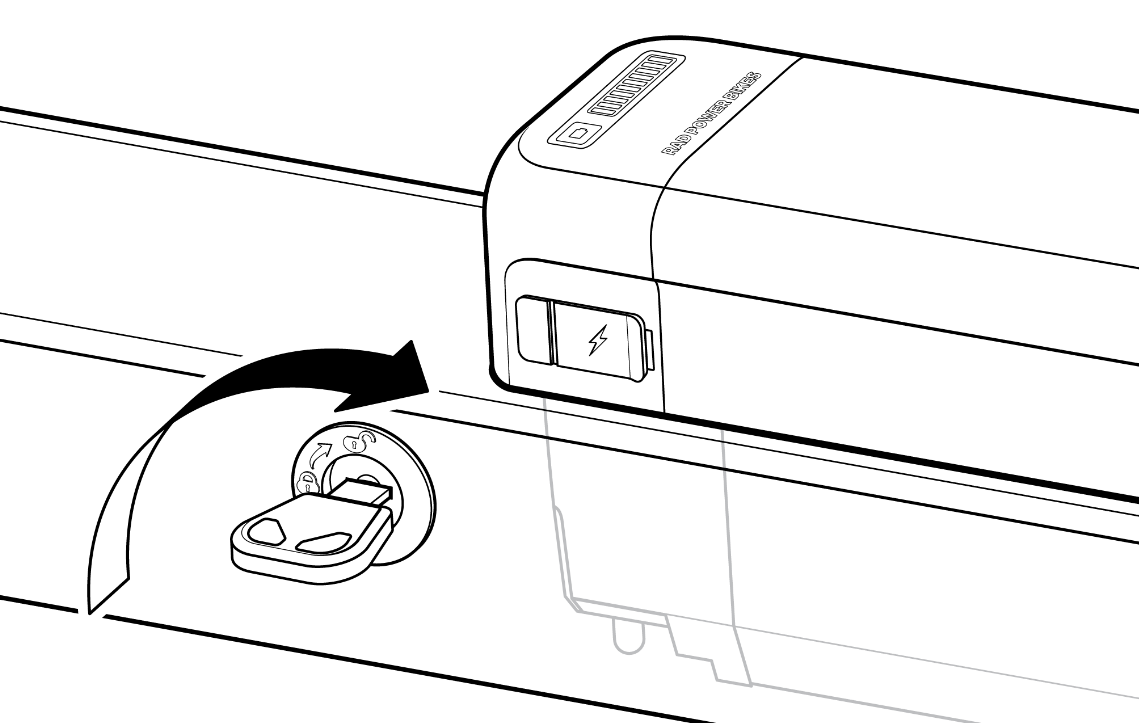
- Turn off the battery. Use the key to turn the key barrel to the "Off, locked" position. Note: The battery can be charged when locked on the bike or unlocked and removed from the bike.
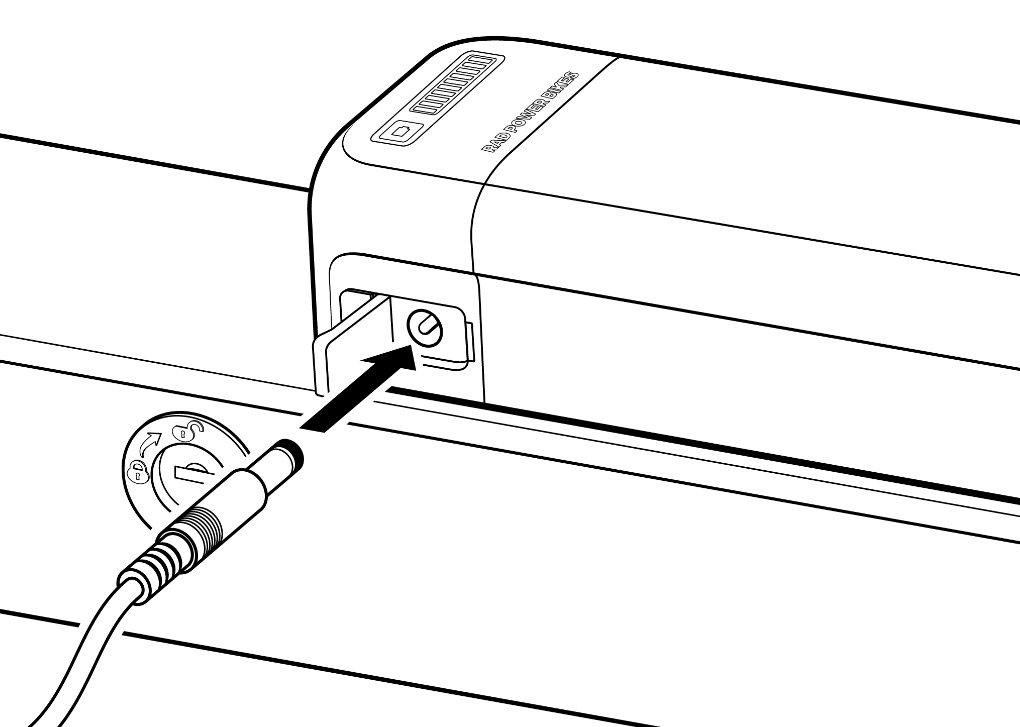
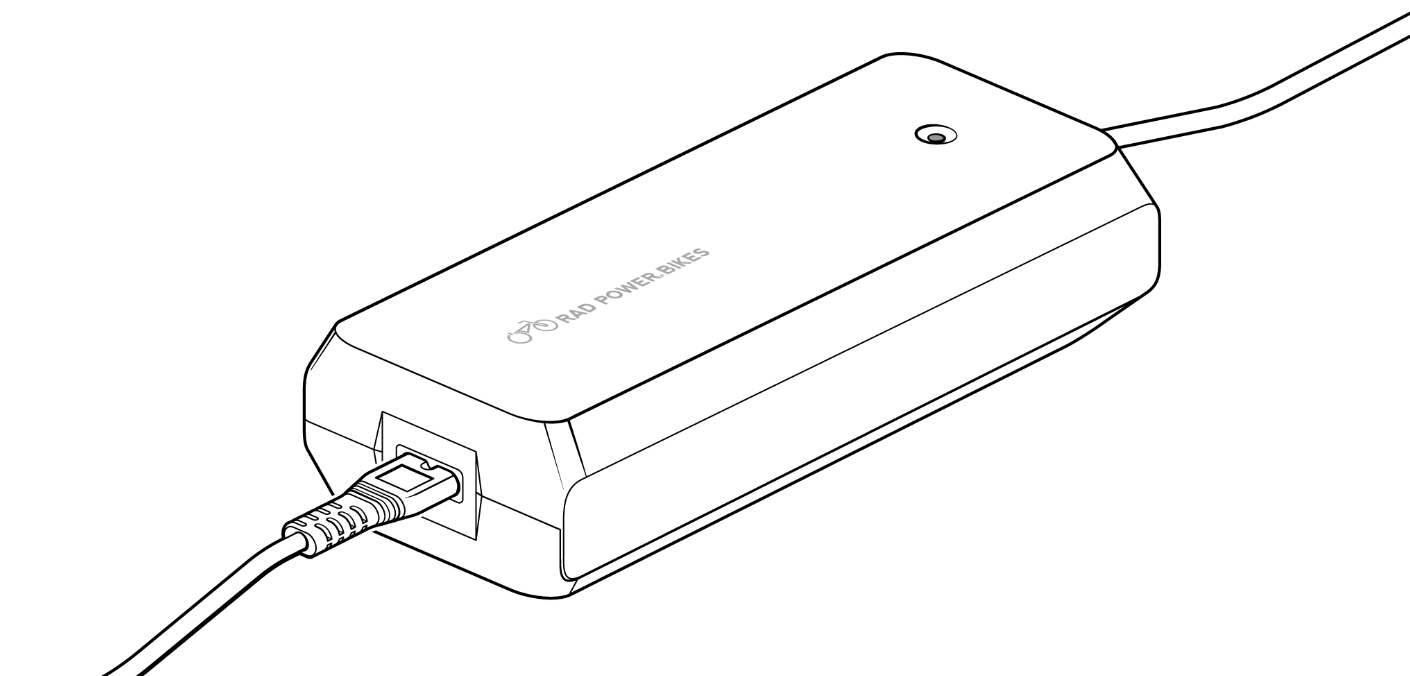
- Remove the rubber cover on the charging port and insert the charger into the charging port.
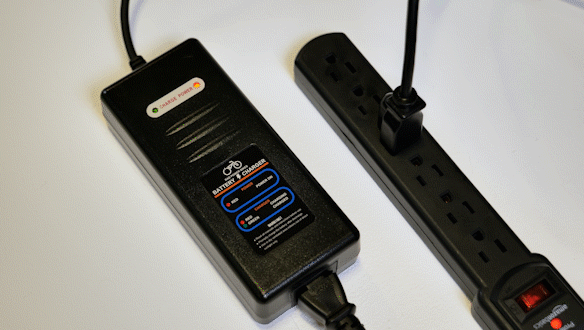
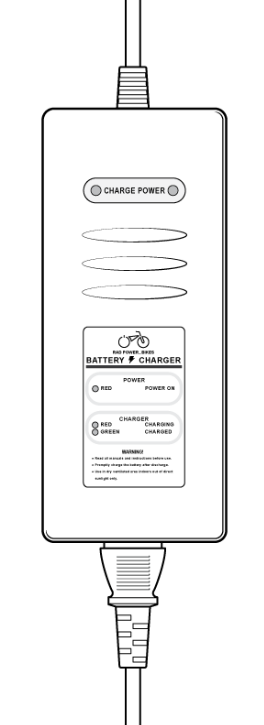
- Plug the charger into an appropriate power outlet. When the charger is plugged in, two red lights will illuminate to show that the battery is charging.
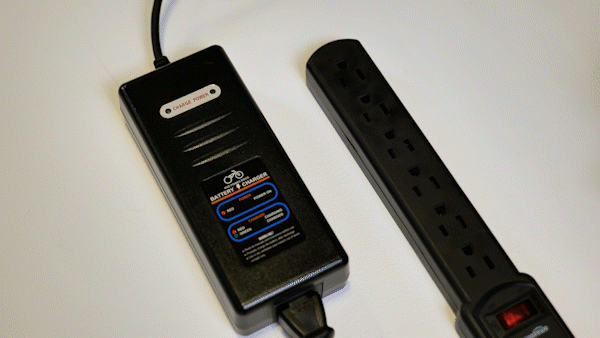
- Charge the battery, making sure to not charge for longer than 12 hours at a time. When the battery is fully charged, one LED will turn green and one will remain red (shown below).
Note: The charger is designed to automatically stop charging when the battery is full, but unnecessary wear of the charging components could occur if the charger is left attached to the battery and a power source for longer than 12 hours. Detach the charger as soon as possible once the green light indicates a complete charge, to avoid unnecessary wear of charging components.
- Once the battery is charged, unplug the charger from the power outlet. Unplug the charger from the outlet by pulling on the plug. Do not remove the plug from the outlet by pulling only on the cord.
- Unplug the charger from the battery. Store the charger in a safe place for future use.
Battery Balancing
Battery balancing is an important process to help keep your battery in great shape for years to come. This process will help ensure the cells in the battery are balanced and operating as efficiently as possible.
The process will involve riding your bike, then charging the battery after each of your first three rides. After completing the battery balancing process, charge normally as needed, and only repeat the battery balancing process when recommended. Battery balancing should be done when a battery is new, after a period of long-term battery storage, if experiencing noticeable range decline, if instructed to do so by Rad Power Bikes Product Support, or up to once per month.
Note: Do not perform battery balancing more than once per month.
Battery Balancing Steps
Follow the instructions below to balance your battery.
- Take a look at the Battery Charging Steps in the section above to learn how to charge the battery.
Note: Never leave a battery unattended while charging. - Take your first ride. Ride the bike and use power assistance (the pedal assist system or the twist power assist) normally.
After your first ride: Charge your battery for as close to 12 hours as possible, but not longer than 12 hours. Charge the battery even if you only used a small amount of battery power while riding. The charger indicator lights may change to green and red to show that the battery is full, but keep the battery plugged in and charging for as close to 12 hours as possible. - Take your second ride. Ride the bike again and use power assistance (the pedal assist system or the twist power assist ) normally.
After your second ride: Charge your battery again for as close to 12 hours as possible (even if the charger indicator lights turn green and red). Do not charge the battery longer than 12 hours. Charge the battery even if you only used a small amount of battery power while riding. - Take your third ride. Ride the bike again and use power assistance (the pedal assist system or the twist power assist) normally.
After your third ride: Charge your battery again for as close to 12 hours as possible (even if the charger indicator lights turn green and red). Do not charge the battery longer than 12 hours. Charge the battery even if you only used a small amount of battery power while riding. - Take your fourth ride. Ride the bike again and use power assistance (the pedal assist system or the twist power assist) normally.
After your fourth ride and beyond: Charge your battery after each ride by following the Battery Charging Steps in the previous section. Remove the charger from the battery as soon as you see the charging indicator lights on the charger change to one green and one red light to indicate that the battery is fully charged. This usually happens within 3–7 hours of charging.
For more detailed information on battery charging and maintenance, check out your owner's manual, available for download HERE.
Do not leave a charging battery unattended. Never charge a battery for more than 12 hours at a time. Failure to follow battery charging best practices could result in unnecessary wear to the charging components, battery, and or charger, and could lead to an under-performing or non-functional battery and replacement will not be covered under warranty. Failure to follow battery charging best practices could result in unnecessary wear to the charging components, battery, and or charger, and could lead to an under-performing or non-functional battery and replacement will not be covered under warranty.
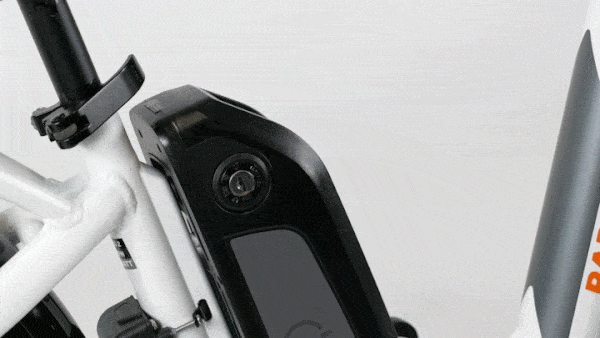
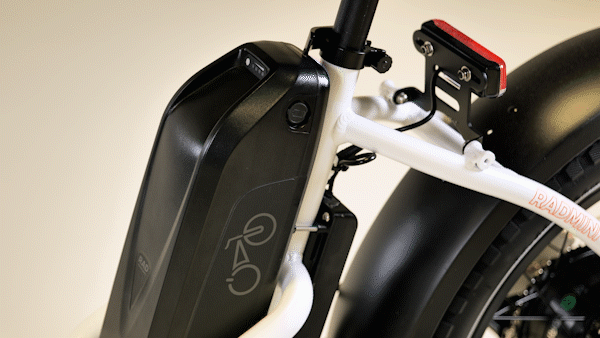
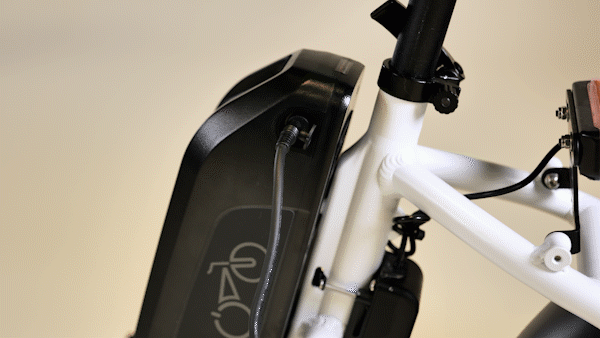
Charging a Semi-Integrated Battery
The following steps apply to the semi-integrated batteries on the RadRover 6 Plus and RadCity 5 Plus bikes. Additional information on the semi-integrated batteries can be found in the "Semi-Integrated Battery Q&A" Help Center article.
Do not use a battery or charger not purchased directly from Rad Power Bikes. Aftermarket or third-party products have not been tested for safety and compatibility with our bikes and use of these products could cause issues, including property damage, voiding your warranty, or injury/death.
Estimated Charging Times
The time the charger takes to fully charge the battery depends on factors including distance traveled, riding characteristics, terrain, payload, and battery age. The table provides a rough estimate of charge time based on common distances traveled in regular operation.
The battery may take longer to charge when fully depleted, when very new, and after 3–5 years of regular use. If your battery doesn’t seem to be charging normally, is taking longer to charge than expected, or you’re experiencing substantial reduction in range, discontinue use and contact Rad Power Bikes Product Support.
| Distance | Recharge Time |
|---|---|
| 5 mi (8 km) | 1 hour |
| 10 mi (16 km) | 1.5 hours |
| 15 mi (24 km) | 2.5 hours |
| 20 mi (32 km) | 3.5 hours |
| 25 mi (40 km) | 4.5 hours |
| 30 mi (48 km) | 5.5 hours |
| 45 mi (72 km) | 7 hours |
Battery Charging Steps
Recharge the battery after each ride. Always charge it back to full so it is ready to go the full range per charge next time you want to ride.
Charge an empty battery as soon as possible. If the battery is completely empty, charge it as soon as possible. Storing a depleted (empty) battery can lead to permanent loss of range or loss of battery life.
Follow the steps below to charge a semi-integrated battery.
- Ensure the bike is off. Press and hold the power button on the UI Remote until the display turns off. If desired, use the key to unlock and remove the battery from the bike frame. The battery can be charged while it is on or off the bike.
- Inspect the battery, charger, and electrical cables for damage. If everything looks fine, proceed with the rest of the steps. If you find any damage, don’t charge your bike. Instead, take photos and contact Rad Power Bikes Product Support.
- Plug the charger into the battery’s charging port. Place the charger on a flat, secure surface with the charging status light facing up, open the rubber cover on the battery’s charging port, and connect the DC output plug from the charger (round barrel connector) to the charging port on the side of the battery.
- Plug the charger into a power outlet. Connect the charger input plug (110/220-volt plug) to the power outlet. Charging should initiate and will be indicated by the charger status light on the charger turning red.
Newer models of the charger will have a single light that will turn red when plugged in.
- Disconnect the charger. Once fully charged, indicated by the charger status light turning green, disconnect the charger from the outlet, and then the charger from the battery by pulling directly on the plugs, not the wires themselves.
The charger is designed to stop charging automatically when the battery is fully charged. Nevertheless, we recommend you disconnect the battery from the power source and charger as soon as possible once charging is complete. As with any appliance, you should unplug your charger when you’re not using it to charge your battery. This will also prevent range decline from unnecessary charging.
Battery Balancing
You do not need to balance your semi-integrated battery unless Rad Power Bikes Product Support recommends it. Semi-integrated batteries stay well balanced under normal use conditions. Follow the use, charging, and storage instructions in the Owner's Manual, and your battery should provide you with excellent performance.
Store a Battery Long-Term
If storing your bike from Rad Power Bikes for longer than two weeks at a time, follow the recommendations below to maintain the health and longevity of your battery.
- Charge (or discharge) the battery to approximately 75% charged.
- Power off the battery either locked to the frame or unlocked and removed from the frame for storage.
- Store the battery in a dry, climate controlled, indoor location between 50° F–77° F (10° C–25° C).
- Check the battery monthly, and if necessary, use the charger from Rad Power Bikes to charge the battery to 75% charged.
- Complete the battery balancing process in the previous section after a period of long-term storage and before the first ride. This process will help ensure the cells in the battery are balanced and operating as efficiently as possible.
Incorrect storage of your battery can result in a damaged or non-functional battery. Follow the above instructions to reduce such risk. Batteries damaged by improper use, charging, or storage will not be replaced under warranty. To get the maximum life and performance out of your battery, proper use and charging is important.
For more information about how to best maximize your battery life, check out this article on the RPBlog!
Click HERE for more information about our batteries, and click HERE to learn about how to remove the battery and check the charge level.