Pedal Assist (PAS) Sensor Magnet Ring Replacement Guide
When the Pedal Assist Level is set to greater than 0 and a rider is pedaling, a magnet ring near the bottom bracket sends a signal to the pedal assist (PAS) sensor to deliver power assistance to the rider.
The magnet ring can be replaced in the unlikely event it is damaged or determined to be non-functional by Rad Power Bikes Product Support. The instructions below will show you (or your bike mechanic) how to perform this replacement.
This guide shows a magnet ring replacement on a 2019 RadCity Step-Thru, but the steps will be the same for most models.
If you are not confident in your ability to successfully and safely perform all steps, we recommend having the work performed or checked by a local, certified, and reputable bike mechanic.
You will need:
- An 8 mm Allen wrench
- A crank puller for standard square taper cranks
- Clean paper towels or shop towels
- Blue (medium strength) threadlocker
- A torque wrench with an 8 mm Allen bit
- The replacement magnet ring
Remove the Crank and the Old Magnet Ring
- Get the bike ready for maintenance. Turn off the bike, unlock and remove the battery, and press and hold MODE (or the power button) to discharge remaining power.
- Remove the crank on the pedal assist (PAS) sensor side of the bike:
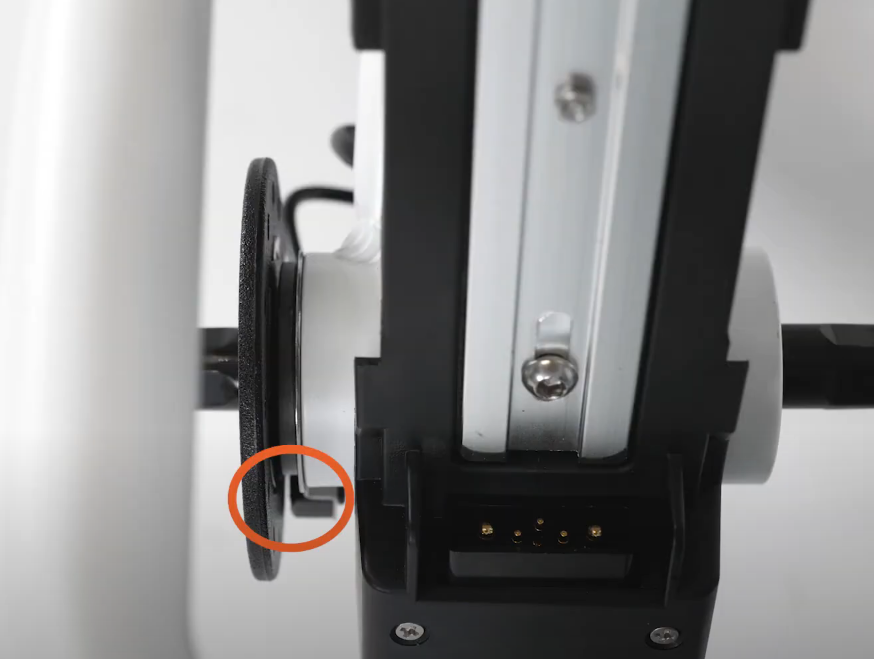
- Locate the magnet ring. From the front of the bike, look directly at where the cranks meet the bottom bracket. The crank will need to be removed on the side where the magnet ring is visible.
- Remove the crank bolt. Have a friend stabilize the bike if needed, and use an 8 mm Allen wrench, turning counterclockwise, to remove the bolt. Set the bolt aside.
- Inspect and clean the crank threads. Take a look at the inside of the crank arm threads, and use a paper towel to remove any dirt or grime, which can cause damage.
- Prepare the crank puller. Prepare the crank puller so the inner bolt, or press, is below the end of the outer portion of the tool.
- Carefully thread the outer portion of the crank puller by hand into the crank, turning clockwise, at least 5 rotations. The outer portion of the crank puller should thread easily when properly aligned. Use caution to not cross thread or damage the threads.
Ensure the outer portion threads into the crank fully, at least five full rotations. This will ensure the crank and tool threads have as much gripping power as possible. Using the press of the tool when it is not properly secured can lead to irreversible damage to the crank.
- Carefully thread in the inner portion of the crank puller by turning the handle clockwise.
- Use the crank puller to press the crank off the bottom bracket. Hold onto the crank arm, and push down on the tool's handle to engage the inner bolt, which will press against the bottom bracket and will eventually (sometimes suddenly) unseat the crank.
Use caution and keep fingers clear of the space between the crank and the tool to avoid injury.
- Remove the crank. Remove the crank from the bike. If removing the right crank, allow the chain to hang out of the way. Carefully remove the tool from the crank.
- Inspect the crank and the square taper mounts on the spindle. After the crank is removed, take a close look at the crank and the square taper mount to make sure it's in good condition. It is unlikely that there will be any signs of wear, rounding/warping, or damage, but if you do notice anything that could cause damage on the new crank once installed, contact us for help.
- Locate the magnet ring. From the front of the bike, look directly at where the cranks meet the bottom bracket. The crank will need to be removed on the side where the magnet ring is visible.
- Remove the magnet ring from the spindle. Hold the other crank in place and carefully rotate the magnet ring off of the spindle. Recycle the magnet ring according to local rules.
Continue to the next section to install the new magnet ring and reinstall the crank.
Install the New Magnet Ring and Reinstall the Crank
- Locate the new magnet ring and orient it so the side with the arrows faces toward the bike.
- Install the new magnet ring on the spindle. Press the ring onto the mount and twist it clockwise to move the ring as close as possible to the PAS sensor without the ring touching the sensor.
- Reinstall the crank:
- Orient the crank for installation and place it in position on the spindle. Position the crank so it is in line with the other crank and the pedals are on opposite ends.
- Install the bolt. Apply a small amount of blue threadlocker to the crank arm bolt and thread the bolt into the mount. Use caution to keep threadlocker from making contact with any plastics.
- Torque the crank arm bolt. Use a torque wrench with an 8 mm Allen bit to torque the crank arm bolt to 35 Nm.
- Orient the crank for installation and place it in position on the spindle. Position the crank so it is in line with the other crank and the pedals are on opposite ends.
- Reinstall the chain. Push the derailleur housing forward to create chain slack. At the same time, use a paper towel (or the shaft of an Allen wrench) to lift the chain onto the teeth of the chainring.
- Test the chain. Rotate the cranks backward and check that the chain is properly mounted on the chainring.

- Test the bike fully. Reinstall the battery and test the bike fully before riding.