RadMini Front Fork Replacement Guide
The front fork on your RadMini can be replaced in the unlikely event it is damaged or determined to be non-functional by Rad Power Bikes Product support.
Tools Needed:
- 3 mm Allen wrench
- 4 mm Allen wrench
- 5 mm Allen wrench
- 10 mm wrench
- Flat side cutters
- Torque wrench with Allen bits
- A few zip ties
Remove the Fork
- Get the bike ready for maintenance.Turn off the bike, remove the battery, and press MODE to discharge remaining power.
- Remove the front wheel.
- Take a photo of the orientation of cables at the front of the bike to refer to during reinstallation.
- If fenders are installed: Use a 4 mm Allen wrench to remove the bolts securing the fender arms to the front wheel. Set the bolts aside. The fender will be completely removed at a later step.
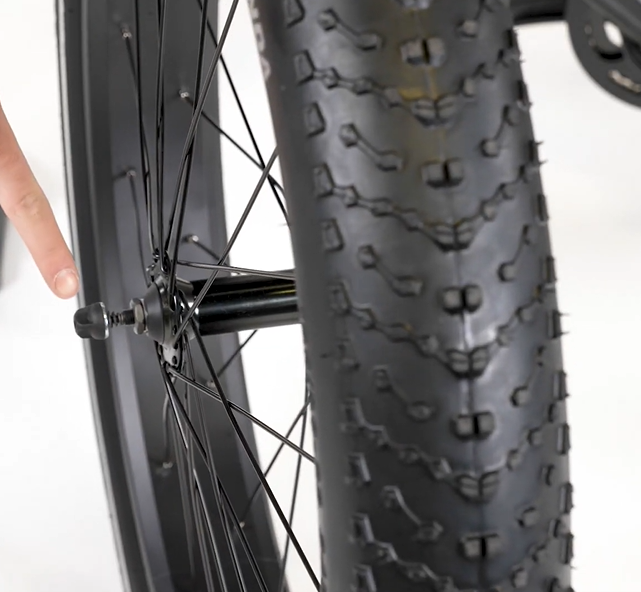
- Open the quick release lever and remove the thumbnut and cone spring on the other side of the wheel. Set the thumbnut and cone spring aside.
- While holding onto the wheel, pull out the quick release skewer and keep the cone spring installed on the skewer. Set the quick release skewer aside for reinstallation.
- Lift the front of the bike and remove the front wheel.
- Remove the brake caliper. Use a 5 mm Allen wrench to remove the brake caliper.
- Remove the brake housing clamp. Use a 3 mm Allen wrench to remove the brake housing clamp and set aside.
- Unplug and remove the headlight. Trace the cable from the headlight to connector. Pull each side of the connector directly apart, without twisting, to unplug. Use a 5 mm Allen wrench and 10 mm wrench to remove the headlight. Set the headlight and hardware aside. If a fender is installed, it can now be removed and set aside.
- Fold down the handlebar. Press the red button on the quick release lever and pull the lever downward. Fold the handlebar away from the bike.
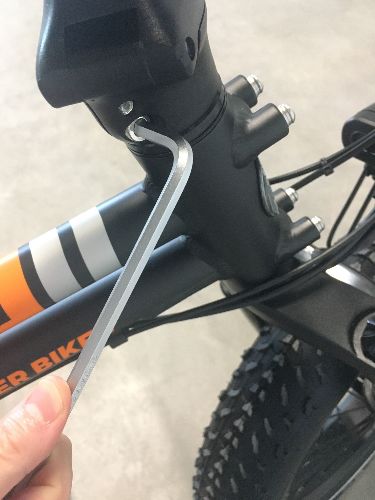
- Loosen the top cap and bolt. Remove the rubber cap and set it aside. Use a 5 mm Allen wrench to loosen (but not remove) the top cap bolt.

- Loosen the handlebar stem clamp bolts. Use a 5 mm Allen wrench to loosen (but not remove) the handlebar stem clamp bolts.
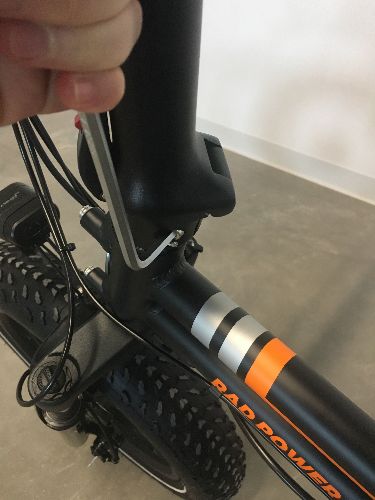
- Remove the fork from the bike. Carefully remove the fork from the headtube. Recycle the front fork where possible.
- Remove the spacers, dust cap, and compression ring from the headtube.Remove one piece at a time and set aside. Make note of the orientation of these pieces as this is important for reinstallation. Take a photo of the order, if needed.
Install the New Fork
- Install the spacers onto the steer tube.Slide the compression ring onto the steer tube with the smaller end facing downward. Install the headset dust cap and spacers in the correct order. Refer to the photo taken earlier, if needed.
- Insert the new fork into the headtube.Trace the cables coming from the handlebar to make sure no cables are pinched or twisted and that all cables are routed correctly. Use the photo taken earlier for reference, if needed.
- Tighten the top cap bolt until you feel a bit of resistance.
- Check if the bolt is tight enough by unfolding the stem and locking it in place.With the handlebar turned and perpendicular to the bike frame, carefully push and pull the handlebar forward and backwards while feeling for play at the connection of the handlebar stem and the headtube. If there is any movement at that connection point, the top cap is too loose. Fold the stem, tighten the top cap 1/4 turn, unfold the stem, and test again. Repeat until there is no movement at the stem-headtube connection.Reinstall the rubber cap over the top cap bolt.
- Align the stem and handlebar with the front wheel so the handlebar is pointing forward. Torque the handlebar stem clamp bolts, starting with the lower bolt, to 12 Nm.
- Install and plug in the headlight.
- If fenders were installed: From behind the fork, pass the fender under the fork and over the wheel. Place the fender mounting point over the mounting point on the fork, and install the headlight through the fender and fork mounting points using the steps below.
- Pass a washer over the bolt end and pass the bolt through the fork mounting point.
- On the other side of the mounting point, pass the other washer and lock nut over the bolt end. Torque to 6 Nm.
- Locate the matching connector end. Line up the internal notches and pins (and external connectors) and press each side directly together, without twisting, to reconnect.
- Install the brake housing clamp. Place the brake cable into position and place the brake housing clamp over the cable. Use a 3 mm Allen wrench to secure the brake housing clamp.
- Install the brake caliper. The caliper must be installed with the longer bolt at the top. Tighten the bolts until there is still play in the caliper. Do not tighten the bolts completely.
Reinstall the Wheel
- Reinstall the front wheel.
- Install the skewer. On the brake rotor side of the wheel, pass the skewer through the hub and install the cone spring on the other side. Both cone springs should point in, toward the wheel hub. Thread the thumb nut just a couple of turns, leaving enough room for the fork dropouts. Leave the lever open.
- Lower the fork onto the wheel. Make sure the lever is open, then carefully lift the front of the bike and lower the fork onto the wheel. The brake rotor should go into the brake caliper, in between the brake pads, and the axle should enter the fork dropouts fully.
- If installing the front wheel is difficult, use a 5 mm Allen wrench to widen the gap between the brake pads by turning the inner pad adjuster “out”, or counterclockwise, two clicks, then install the wheel.

- Check that the wheel is fully seated in the dropouts and that it is centered.
- Secure the quick release lever. Hold the quick release lever in line with the axle and tighten the thumbnut on the opposite side until the lever can stay parallel to the floor without being held. Then use the palm of your hand to close the lever without touching the brake rotor. There should be enough resistance that the lever leaves an imprint on your palm.
- Install the skewer. On the brake rotor side of the wheel, pass the skewer through the hub and install the cone spring on the other side. Both cone springs should point in, toward the wheel hub. Thread the thumb nut just a couple of turns, leaving enough room for the fork dropouts. Leave the lever open.
- Center the caliper. Squeeze and hold the brake lever that controls the caliper and use a 5 mm Allen wrench to tighten each bolt on the caliper 1/4 turn at a time. Torque the bolts 8-10 Nm.
- Reinstall the battery and test the bike fully before riding.
If you are not confident in your ability to successfully and safely perform all steps, we recommend having the work performed by a local, certified, and reputable bike mechanic.