New Owner's Guide
Thanks for choosing Rad Power Bikes! We have put together a couple of quick tips to help you ride Rad!
To get started, watch our Safety video below to learn some tips for a safe ride, then click on a heading below to learn more about how to use and enjoy your bike!
Bike Operation
Turn the Bike ON or OFF
Turn ON the Bike
- Lock the battery to the frame in the ON, Locked position. Insert one of the two identical keys into the key barrel of the battery and turn the key to align the key port with the small open circle icon, indicating the battery is in the "ON, Locked" position. Remove the key by pulling directly out of the key port, keeping it aligned with the "ON, Locked" icon.
.jpg?revision=1)
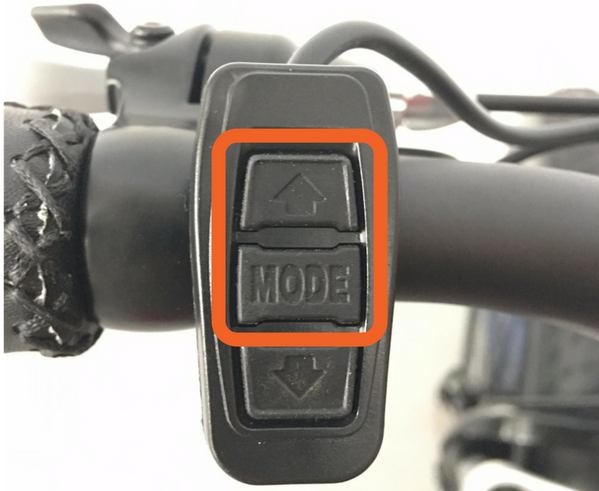
- Turn on the electrical system. Locate the three-button display remote on the left side of the handlebar. Press and hold the MODE button for about 2 seconds, until the LCD display turns on.

Your bike comes with two identical keys to turn your battery on and off. These keys are unique to your bike. For help with lost keys, please contact us and we'll help get you back up and running!
Click HERE to learn about your bike's battery details, charging, and care.
Turn OFF the Bike
- Turn off the electrical system. Press and hold the MODE button on the display remote for about 2 seconds until the LCD display turns off.
- Turn the battery off one of two ways: turn the key to the "OFF, Locked" position to keep it locked to the frame or press and turn the key to the "OFF, Unlocked" position and remove the battery from the frame.
Always check that the battery is securely locked to the battery mounting tray before riding.
Turn ON the Headlight, Taillight, and LCD Display Backlight
Turn ON the Lights
Models released in 2019 and after being equipped with an integrated taillight that is activated when the bike is turned on and a brake lever is squeezed. Use the headlight and taillight when riding with limited visibility.
- Angle your headlight slightly downward. The headlight should light up the ground and not blind oncoming traffic.
- Turn ON the bike. Press and hold MODE to turn on the bike.
- Push the UP arrow and MODE button at the same time. This will activate the front headlight, the taillight, the brake light (when a brake lever is squeezed), and the LCD display backlight.
- Squeeze a brake lever to test the taillight. Always test the taillight before riding in limited visibility conditions.
Turn on Flash Mode
Flash Mode allows the taillight to flash with or without the headlight being turned on.
- Turn on the bike. Press and hold MODE to turn on the bike.
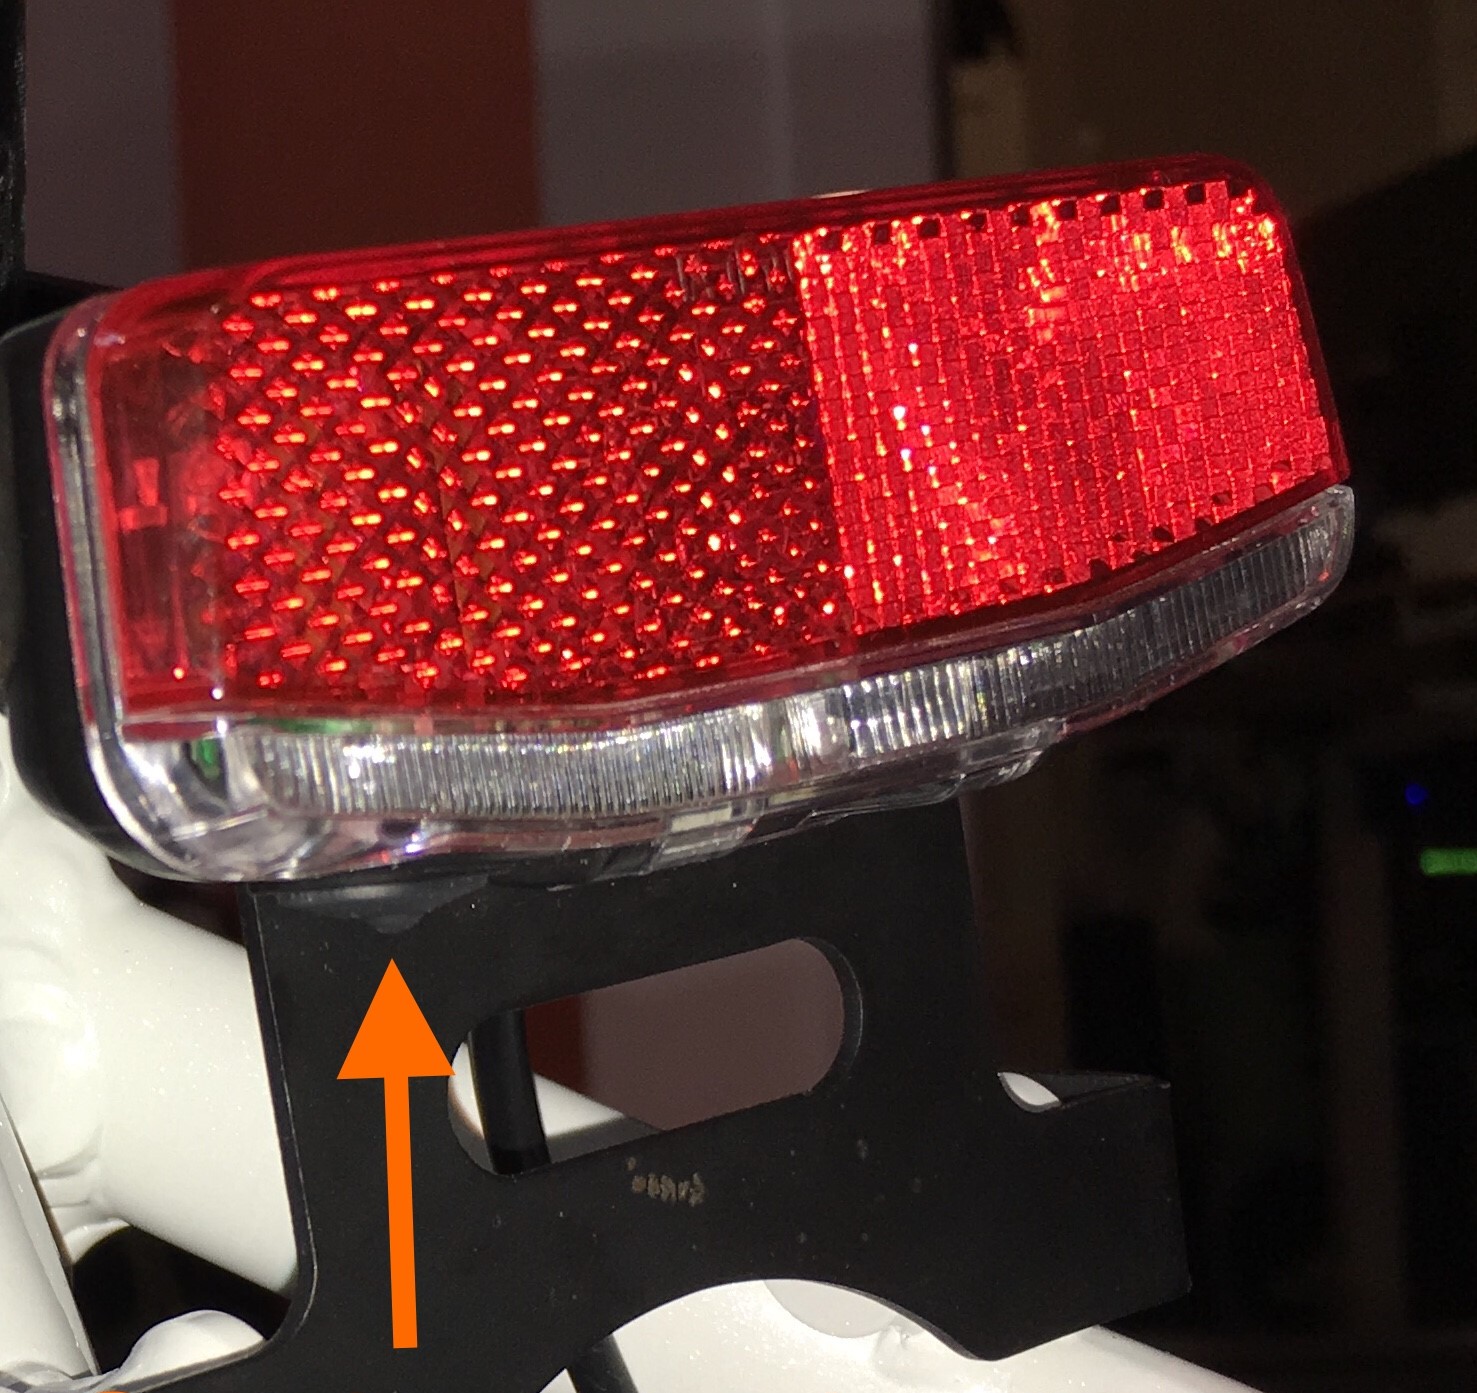
- Press the Flash Mode button on the taillight. Press the rubber button on the left underside of the taillight.
- Squeeze a brake lever to test the taillight. When a brake lever is squeezed, the taillight will illuminate a brighter, solid brake light. Always test the taillight before riding in limited visibility conditions.
If enabled while the headlight is powered on, Flash Mode will continue if the headlight is turned off. When the bike is turned off and back on again, Flash Mode will need to be enabled again by pressing the Flash Mode button on the taillight.
Riding a bicycle at night is much more dangerous than riding during the day. Ride at night only when necessary. If you choose to ride in poor visibility conditions, first check to ensure you comply with all local laws regarding night riding. Check reflectors/lighting equipment and their mounting hardware before each ride to make sure they are clean, installed properly, functional, visible, and secure. Wear reflective and light-colored clothing, slow down, and use familiar roads with street lighting when possible while riding at night.
LCD Display Features & USB Charging
The LCD display shows details about your bike. Most bikes ship with an LCD display, except for the RadRunner, which is shipped with an LED display. Click HERE to watch our LCD Display Features video to learn about what your LCD display can do!
The RadRunner display includes a power button, battery charge indicator, PAS level selector, and PAS level indicator lights. The RadRunner LED display can now be upgraded to an LCD display! Take a look at The Scenic Route's blog post about it HERE and our installation guide HERE.
LCD Display Features
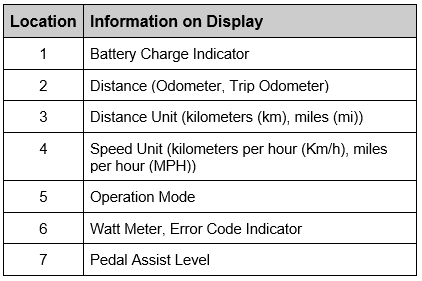
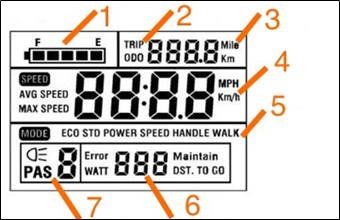
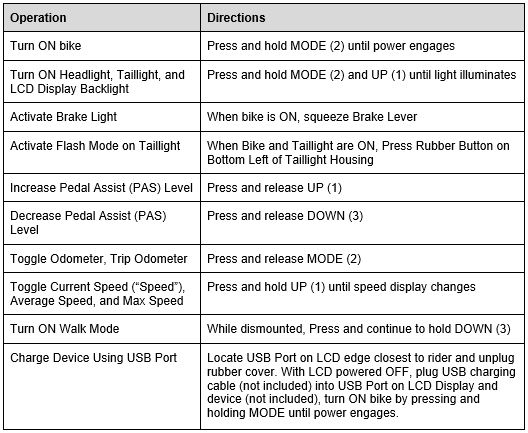
Take a look at the table below for what you can expect to see on your LCD display once it is turned on.
Using the Display
The display remote has three buttons; an up arrow, a MODE button, and a down arrow.
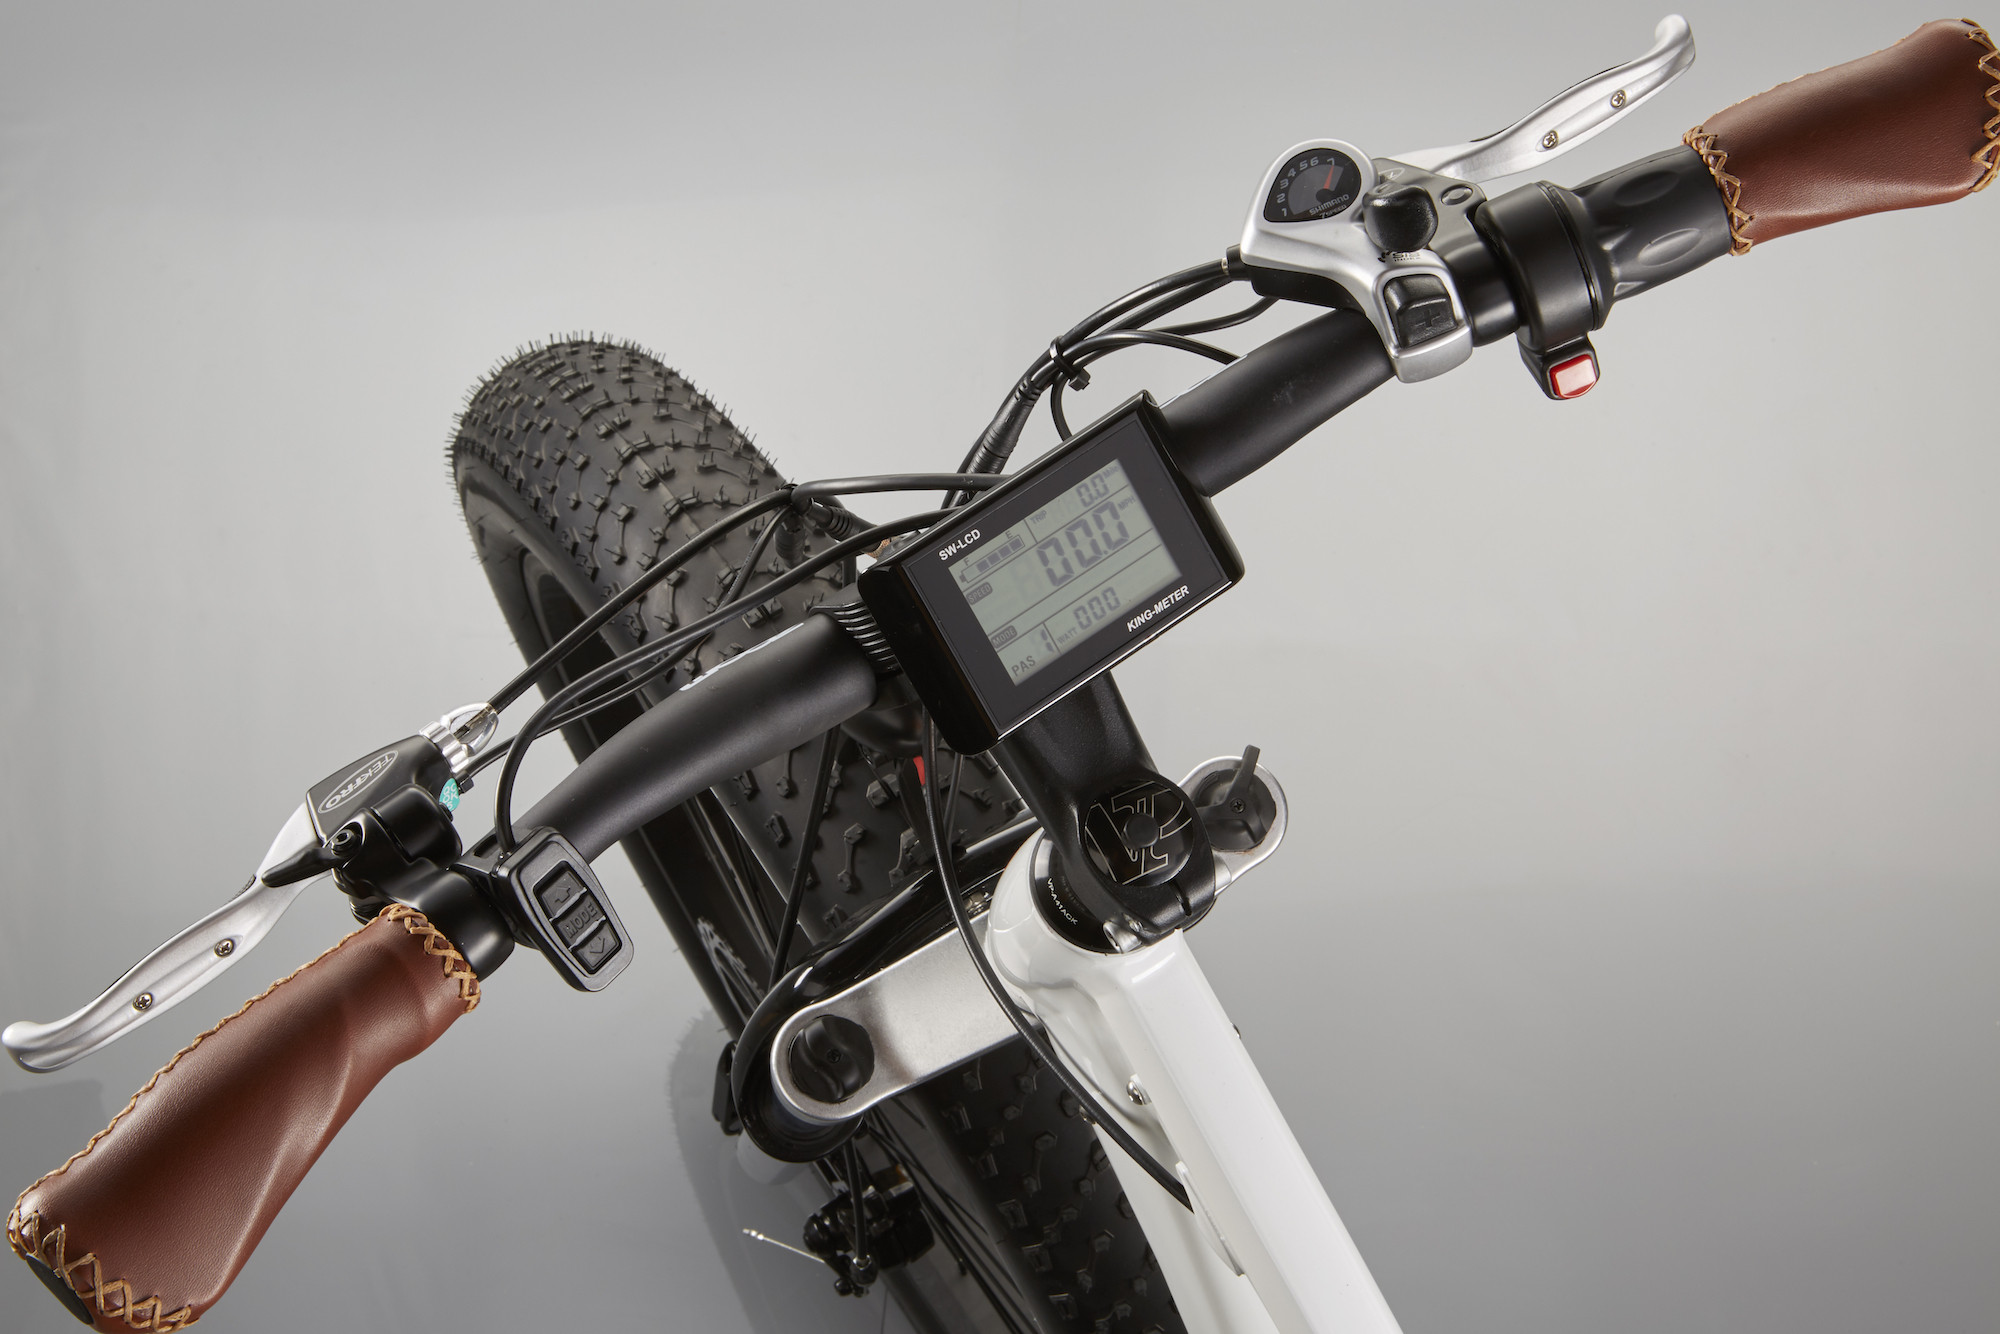

Each button and combinations of the 3 buttons perform a variety of operations and toggle between different information on the LCD Display.
Control the Bike with the Remote and LCD Display
Check out the table below to see how you can view different information on your display with the touch of a button!
Click HERE to learn more about walk mode.
Walk mode should only be used while dismounted from the bike and with both hands on the handlebar. Always keep at least one hand on a brake lever to allow quick cutoff of the motor assistance if necessary and to maintain control of the bike.
Charge a Device with USB Charging
The LCD display has a built-in USB charging port, so you can charge while you ride!
To charge:
- Turn OFF the LCD display. Press and hold MODE until the display turns off.
- Connect the device to the charging port using a USB cable. Plug a USB cable into the charging port on the display, then plug the other end into your device.
- Turn ON the LCD display. Press and hold MODE until the display turns on.
Note: The USB charging port can charge many, but not all, USB devices. Some devices (e.g., large phones) that require higher power to charge may not indicate that they’re charging when plugged in. If the LCD display reads “USB,” but the USB device doesn’t display its charging indicator, the device is receiving supplemental power more slowly than it’s using power—so the device’s state of charge may decrease, but not as quickly as it would if it weren’t plugged in.
Battery Controls & Removal
Battery Controls
The battery can be removed using one of the two identical keys included with your bike. If your key is lost or damaged, contact us for help!
On, locked

Off, locked

Off, unlocked

Remove the Battery
- Turn off the bike. Press and hold the MODE button on the LCD Display remote (or the power button on the LED remote) until the display turns off.
- Use the key to turn off and unlock the battery. Insert the key into the key port, then push and rotate the key to the "OFF, unlocked" position.
- Remove the battery. When in the "OFF, Unlocked" position, you can carefully slide the battery upwards and lift it off the frame. Note: the battery weighs around 8 lbs and should be handled with care.

For more information on how to best care for your battery, please refer to the Rad Power Bikes Owner's Manual that came with your bike or download a copy of your bike's manual from HERE.
When the Battery is Removed
- Do not touch the “+” and “-” terminal contacts on the bottom of the battery when the battery is removed from the bike.
- Be careful not to drop or damage the battery when loose from the bike.
- Avoid damaging the exposed connector terminals and keep them clear of debris.
When Installing the Battery
- Ensure the battery is turned off before sliding the battery into the frame mount receptacle.
- Do not force the battery onto the receptacle; slowly align and push the battery down into the receptacle.
- Ensure the battery has been properly secured to the bike before each use by carefully pulling upwards on the battery with both hands to test the security of the attachment of the battery to the mount.
Use caution to avoid damage to battery connector terminals, which are exposed when the battery is unlocked and removed from the frame of the bike. In the case of damage to the terminals or battery mounts, please discontinue use and contact Rad Power Bikes Product Support immediately.
Click HERE for our battery charging guide and HERE for more information about our battery.
Riding Your Bike
Using the Brakes
Our ebikes use mechanical disc brakes. The brakes are one of the most important components for riding safely as they allow a rider to slow or stop the bike when needed.
Before Each Ride
- Ensure the front and rear brakes are working correctly
- All braking system components are free from damage, and
- Components are properly secured.
Riding Safely
When operating the bike, always squeeze both brake levers evenly when slowing. Squeezing only the front brake can cause excessive stress on components, damage to the bike and parts, and/or loss of control.
Brakes Safety Check
- Ensure neither the front nor rear brake levers touch the handlebar when you fully squeeze the brake levers.
- Check brake pads for wear and ensure they are not over-worn.
- Ensure brake pads are correctly positioned in relation to the brake rotor.
- Ensure brake control cables are correctly adjusted and display no obvious wear.
- Ensure brake control levers are lubricated and tightly secured to the handlebars.
- Test that brake, motor cutoff functions, and brake light (on 2019 models only) are functioning properly when the brake levers are squeezed.
For more information on how to adjust brakes, check out our Disc Brake Adjustment article, and for information on replacing worn brake pads, see our Brake Pad Replacement article.
If you do not have the experience, skill, and tools to complete maintenance and adjustment of your brakes, we recommend consulting a local, certified, and reputable bike mechanic.
Wheels and Tires
Bike tires should be checked before every ride and maintained as needed to keep your bike safe and fun to ride.
Click HERE to find your manual, which contains detailed information about tire care and recommended tire pressure intervals.
Before Each Ride
Visually inspect the tires and inner tubes and check that the wheels spin straight. Always replace tires and inner tubes with punctures, cuts, or damage before riding or serious damage to the bike could occur. Tires without the correct amount of air pressure can reduce performance, increase tire and component wear, and make riding your bike unsafe.
We recommend performing these tire and wheel safety checks:
- Ensure the tires are inflated to the recommended limits displayed on the tire sidewalls and that they hold air.
- Ensure tires have good tread, have no bulges or excessive wear, and are free from any other damage.
- Ensure rims run true and have no obvious wobbles, dents, or kinks.
- Ensure all wheel spokes are tight and not broken.
- Check the axle nuts and the front wheel quick release lever to ensure they are tight. The lever should be fully closed and secured.
Riding Safely
Electric bikes travel at higher speeds, on average, compared to pedal-only bikes, and they are also heavier in comparison; because of this, users must take care to never abuse their bike's wheelsets.
- Avoid traveling over terrain which can damage the tires or wheels.
- Ensure tire pressure is adequate to avoid pinch flats and damage from low pressure.
- Check tire pressure regularly.
When to Replace a Wheel
- The wheel does not spin straight.
- The wheel wobbles side to side or up and down when spinning.
- The wheel becomes untrue or spokes loosen. Do not attempt to true or tighten unless you have adequate knowledge, tools and experience
If you do not have the experience, skill, and tools to maintain the wheels and tires, Rad Power Bikes highly recommends having a local, certified, and reputable bike mechanic complete these procedures as well as any future adjustments or tuning.
Low pressure may result in loss of control, and overinflated tires may burst. Failure to always maintain the air pressure rating indicated on pneumatic tires may result in tire and/or wheel failure. Do not overinflate or underinflated tires. Inflate your tires from a regulated air source with an available pressure gauge. Inflating your tires from an unregulated air source could overinflate them, resulting in a burst tire.
Click HERE to see which tires and inner tubes are compatible with your bike.
To help prevent flat tires and handle them if they do occur, click HERE to learn how to change a flat, or HERE to read our blog post.
Pre-Ride Safety Checklist
Before every ride and after ever, we recommend running through the following checklist to ensure all components of the bike are in good working condition.
- Check that all components are secure.
- Ensure all fasteners are secure and torqued to recommended torque specifications provided in the Owner’s Manual. Look for anything that appears unusual, damaged, or missing.
- Ensure your battery is fully charged and locked to the bike.
- Ensure all externally visible electrical connectors are securely and fully connected.
- Check tire pressure.Check the tire pressure with an air pressure gauge and inspect tires for damage. Make sure tires are properly inflated to the tire pressure recommended in the Owner's Manual.
- Check the twist power assist grip.Ensure the twist power assist is not applied or bound before turning on the bike.
On models released in 2020, the twist power assist is active when the bike is on. On models released in 2019 and earlier, the twist power assist is active when the button is pressed. Use caution when proceeding through the checklist to prevent accidental engagement.
- Check the seat.Ensure the seat is at a safe and comfortable height so the rider can safely mount, pedal, stop, and dismount the bike safely.
- Check the brakes.Test the brakes for proper function.
- Sit on the bike in a clear and open area with the bike ON.
- Engage the front brake (on the left side of the handlebar).
- Lightly apply the twist power assist. The bike should not move since the brake is applied and the e-brake cutoff switch is engaged.
- Release the twist power assist.
- Release the brake.
- Test that the bike and twist power assist will operate with the brake not engaged.
- Release the twist power assist.
- Apply the rear brake (on the right side of the handlebar) and repeat steps to test the other brake.
If the brakes do not cut off the power, immediately discontinue use of the bike and contact Rad Power Bikes as soon as possible. If any other items in the above checklist appear to be out of order, immediately discontinue use of the bike until the item is serviced.
If you do not have the experience, skill, and tools to complete all steps in the checklist, we recommend consulting a local, certified, and reputable bike mechanic for help with these procedures.
Serial Number and Bike Security
The serial number is stamped into the metal of the frame, either at the front of the bike below the RAD badge, oron the underside of the bottom bracket. It is also listed on the outside of the bike box your bike was packaged in.
We attempt to keep a record of all serial numbers, but it's always a good idea to keep a copy of your serial number and order confirmation number for your records.
.jpg?revision=1)
Click HERE to learn about bike security and protecting your bike against loss or theft.
Click HERE to access more Owner Tools, or check out our blog, The Scenic Route, to learn more about our ebikes.